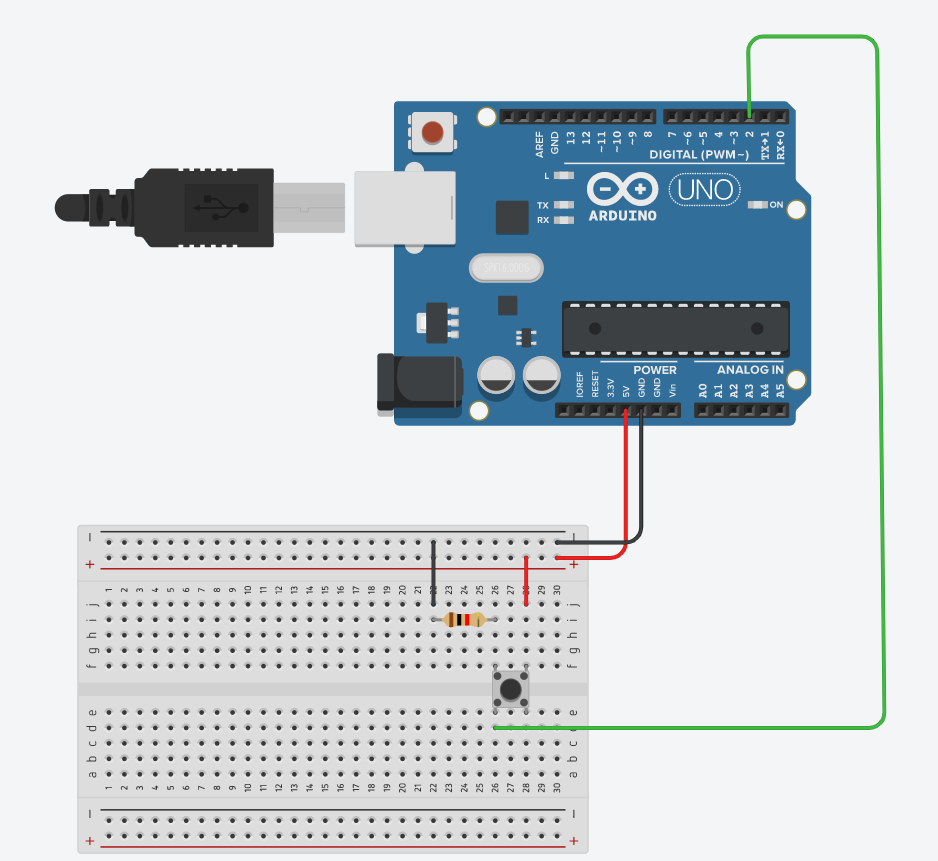
const int buttonPin = 2;     // the number of the pushbutton pin
const int ledPin =  13;      // the number of the LED pin

// variables will change:
int buttonState = 0;         // variable for reading the pushbutton status

void setup() {
  // initialize the LED pin as an output:
  pinMode(ledPin, OUTPUT);
  // initialize the pushbutton pin as an input:
  pinMode(buttonPin, INPUT);
}

void loop() {
  // read the state of the pushbutton value:
  buttonState = digitalRead(buttonPin);

  // check if the pushbutton is pressed. If it is, the buttonState is HIGH:
  if (buttonState == HIGH) {
    // turn LED on:
    digitalWrite(ledPin, HIGH);
  } else {
    // turn LED off:
    digitalWrite(ledPin, LOW);

  }
}
电位器实验
代码展示
int sensorPin = A0; // select the input pin for the potentiometer
int ledPin = 13; // select the pin for the LED
int sensorValue = 0; // variable to store the value coming from the sensor
void setup() {
 // declare the ledPin as an OUTPUT:
 pinMode(ledPin, OUTPUT);
}
void loop() {
 // read the value from the sensor:
 sensorValue = analogRead(sensorPin);
 // turn the ledPin on
 digitalWrite(ledPin, HIGH);
 // stop the program for  milliseconds:
 delay(sensorValue);
 // turn the ledPin off:
 digitalWrite(ledPin, LOW);
 // stop the program for for  milliseconds:
 delay(sensorValue);
}
//
int sensorPin = A0; // select the input pin for the potentiometer
int ledPin = 13; // select the pin for the LED
int sensorValue = 0; // variable to store the value coming from the sensor
void setup() {
 // declare the ledPin as an OUTPUT:
 pinMode(ledPin, OUTPUT);
 Serial.begin(9600);
}
void loop() {
 // read the value from the sensor:
 sensorValue = analogRead(sensorPin);
 // turn the ledPin on
 digitalWrite(ledPin, HIGH);
 // stop the program for  milliseconds:
 delay(sensorValue);
 // turn the ledPin off:
 digitalWrite(ledPin, LOW);
 // stop the program for for  milliseconds:
 delay(sensorValue);
 Serial.println(sensorValue);
 delay(1);
}
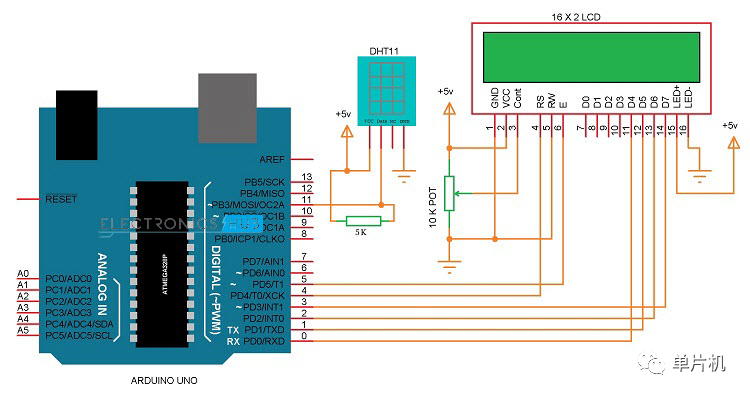
超声波测距,LCD1602显示
实物展示
代码展示
#include  //需要用的到库文件, 这个库需要到arduino ide中安装

LiquidCrystal lcd(2/*RS*/, 3/*E*/, 4/*D4*/, 5/*D5*/, 6/*D6*/, 7/*D7*/);//创建1602显示器实例


//us
// circuit

/*
Arduino        SR04
5V        ---    VCC
A0        ---    Trig
A1        ---    Echo
GND        ---    GND
*/

// pin setting

#define TrigPin A0
// __|^|_____________
// 10us or more HITH SIGNAL will drive it work for one time

#define EchoPin A1
// ______|^^^^^^^^|__
// PULSE WIDTH stand for distance(the time of ultrasound transmit, both go and back)
// pulse width WILL NOT long than 38ms, it means timeout
// Distance = Speed x Time
// Speed of sound ~= 340m/s = 0.340mm/us

int count = 0;

long duration;
// PULSE WIDTH


//湿度
#include "DHT.h"

#define DHTPIN A2     // Digital pin connected to the DHT sensor
// Feather HUZZAH ESP8266 note: use pins 3, 4, 5, 12, 13 or 14 --
// Pin 15 can work but DHT must be disconnected during program upload.

// Uncomment whatever type you're using!
#define DHTTYPE DHT11   // DHT 11
//#define DHTTYPE DHT22   // DHT 22  (AM2302), AM2321
//#define DHTTYPE DHT21   // DHT 21 (AM2301)

// Connect pin 1 (on the left) of the sensor to +5V
// NOTE: If using a board with 3.3V logic like an Arduino Due connect pin 1
// to 3.3V instead of 5V!
// Connect pin 2 of the sensor to whatever your DHTPIN is
// Connect pin 4 (on the right) of the sensor to GROUND
// Connect a 10K resistor from pin 2 (data) to pin 1 (power) of the sensor

// Initialize DHT sensor.
// Note that older versions of this library took an optional third parameter to
// tweak the timings for faster processors.  This parameter is no longer needed
// as the current DHT reading algorithm adjusts itself to work on faster procs.
DHT dht(DHTPIN,DHTTYPE);


void setup() {
    // set Serial communication
    Serial.begin(115200);
    // set pin mode
    pinMode(TrigPin, OUTPUT);
    pinMode(EchoPin, INPUT);
    // init pin
    digitalWrite(TrigPin, LOW);
    delay(1);
  Serial.println(F("DHTxx test!"));

  dht.begin();


  lcd.begin(16, 2); //LCD初始化


  //lcd.print("hello, world!"); //LCD输出字符 hello,world!
}

void loop() {
  lcd.setCursor(0, 1);//设置光标到指定位置
  //lcd.print(millis()/1000);//显示上电到目前为止的秒数
  Serial.println(count++);
  Serial.println(getDistance());
  Serial.println("");
  Serial.println("");
  char tt="";


  delay(1000);

  delay(2000);

  // Reading temperature or humidity takes about 250 milliseconds!
  // Sensor readings may also be up to 2 seconds 'old' (its a very slow sensor)
  float h = dht.readHumidity();
  // Read temperature as Celsius (the default)
  float t = dht.readTemperature();
  // Read temperature as Fahrenheit (isFahrenheit = true)
  float f = dht.readTemperature(true);

  // Check if any reads failed and exit early (to try again).
  if (isnan(h) || isnan(t) || isnan(f)) {
    Serial.println(F("Failed to read from DHT sensor!"));
    return;
  }

  Serial.print(F("Humidity: "));
  Serial.print(h);
  Serial.print(F("%  Temperature: "));
  Serial.print(t);
  Serial.print(F("°C "));
  Serial.print(f);
  Serial.println(F("°F"));


  lcd.clear();
  lcd.print(t);
  lcd.print("C ");
  lcd.setCursor(0, 1);//设置光标到指定位置
  lcd.print(h);
  lcd.print("% ");
}


long getDistance() {
    // trig
    digitalWrite(TrigPin, LOW);
    delayMicroseconds(2);
    digitalWrite(TrigPin, HIGH);
    delayMicroseconds(10);
    digitalWrite(TrigPin, LOW);
    // echo
    duration = pulseIn(EchoPin, HIGH);     // unit: us
    return duration * 0.34029 / 2;         // unit: mm
}
温湿度传感实验
代码展示
#include  //需要用的到库文件, 这个库需要到arduino ide中安装

LiquidCrystal lcd(2/*RS*/, 3/*E*/, 4/*D4*/, 5/*D5*/, 6/*D6*/, 7/*D7*/);//创建1602显示器实例


//us
// circuit

/*
Arduino        SR04
5V        ---    VCC
A0        ---    Trig
A1        ---    Echo
GND        ---    GND
*/

// pin setting

#define TrigPin A0
// __|^|_____________
// 10us or more HITH SIGNAL will drive it work for one time

#define EchoPin A1
// ______|^^^^^^^^|__
// PULSE WIDTH stand for distance(the time of ultrasound transmit, both go and back)
// pulse width WILL NOT long than 38ms, it means timeout
// Distance = Speed x Time
// Speed of sound ~= 340m/s = 0.340mm/us

int count = 0;

long duration;
// PULSE WIDTH


//湿度
#include "DHT.h"

#define DHTPIN A2     // Digital pin connected to the DHT sensor
// Feather HUZZAH ESP8266 note: use pins 3, 4, 5, 12, 13 or 14 --
// Pin 15 can work but DHT must be disconnected during program upload.

// Uncomment whatever type you're using!
#define DHTTYPE DHT11   // DHT 11
//#define DHTTYPE DHT22   // DHT 22  (AM2302), AM2321
//#define DHTTYPE DHT21   // DHT 21 (AM2301)

// Connect pin 1 (on the left) of the sensor to +5V
// NOTE: If using a board with 3.3V logic like an Arduino Due connect pin 1
// to 3.3V instead of 5V!
// Connect pin 2 of the sensor to whatever your DHTPIN is
// Connect pin 4 (on the right) of the sensor to GROUND
// Connect a 10K resistor from pin 2 (data) to pin 1 (power) of the sensor

// Initialize DHT sensor.
// Note that older versions of this library took an optional third parameter to
// tweak the timings for faster processors.  This parameter is no longer needed
// as the current DHT reading algorithm adjusts itself to work on faster procs.
DHT dht(DHTPIN,DHTTYPE);


void setup() {
    // set Serial communication
    Serial.begin(115200);
    // set pin mode
    pinMode(TrigPin, OUTPUT);
    pinMode(EchoPin, INPUT);
    // init pin
    digitalWrite(TrigPin, LOW);
    delay(1);
  Serial.println(F("DHTxx test!"));

  dht.begin();


  lcd.begin(16, 2); //LCD初始化


  //lcd.print("hello, world!"); //LCD输出字符 hello,world!
}

void loop() {
  lcd.setCursor(0, 1);//设置光标到指定位置
  //lcd.print(millis()/1000);//显示上电到目前为止的秒数
  Serial.println(count++);
  Serial.println(getDistance());
  Serial.println("");
  Serial.println("");
  char tt="";


  delay(1000);

  delay(2000);

  // Reading temperature or humidity takes about 250 milliseconds!
  // Sensor readings may also be up to 2 seconds 'old' (its a very slow sensor)
  float h = dht.readHumidity();
  // Read temperature as Celsius (the default)
  float t = dht.readTemperature();
  // Read temperature as Fahrenheit (isFahrenheit = true)
  float f = dht.readTemperature(true);

  // Check if any reads failed and exit early (to try again).
  if (isnan(h) || isnan(t) || isnan(f)) {
    Serial.println(F("Failed to read from DHT sensor!"));
    return;
  }

  Serial.print(F("Humidity: "));
  Serial.print(h);
  Serial.print(F("%  Temperature: "));
  Serial.print(t);
  Serial.print(F("°C "));
  Serial.print(f);
  Serial.println(F("°F"));


  lcd.clear();
  lcd.print(t);
  lcd.print("C ");
  lcd.setCursor(0, 1);//设置光标到指定位置
  lcd.print(h);
  lcd.print("% ");
}


long getDistance() {
    // trig
    digitalWrite(TrigPin, LOW);
    delayMicroseconds(2);
    digitalWrite(TrigPin, HIGH);
    delayMicroseconds(10);
    digitalWrite(TrigPin, LOW);
    // echo
    duration = pulseIn(EchoPin, HIGH);     // unit: us
    return duration * 0.34029 / 2;         // unit: mm
}